If you are doing Blogging and your Blog is Hosted on blogger.com then you might have faced the problem of contact us page.
But don't worry today we are here with the solution of your problem and today we will tell you How to Add Contact Us Page (Contact Form) In Blogger 2025 with step by step Guide.
And the best part is that we will provide you all the code which you need to create you Contact page.
The Contact Page which we are going to provide you is Custom coded and you will not find this type of Contact page anywhere on the Internet.
Keep Reading...!
First of all lets discuss,
Why contact us Page is Important ?
Suppose your reader has any problem or he/she wants to contact you but you dont have any page for that.
So,in that case how they will contact you ?
So,there is only one Solution which is Contact Page.
Thats why this page is very important .
How to Add Contact Us Page In Blogger [2025]
There are various ways to add the Contact page Like you can use the Third party contact page Builders Like 123contactform, Foxyform to make the contact page.
But as we have told you earlier we will show you How to Add Contact Us Page In Blogger 2025 using custom code.
Now let's see how you can add contact us Page on your Blog Easily with step by step Guide.
PART 1 : Adding the Contact Page.
just follow all the steps which we have shown below and you will be able to add the contact form easily.
Step 1:
Go to Blogger.com and log-in to your account.If you have created multiple Blogs then you need to select the Blog on which you want to add Contact- Page.
Step 2:
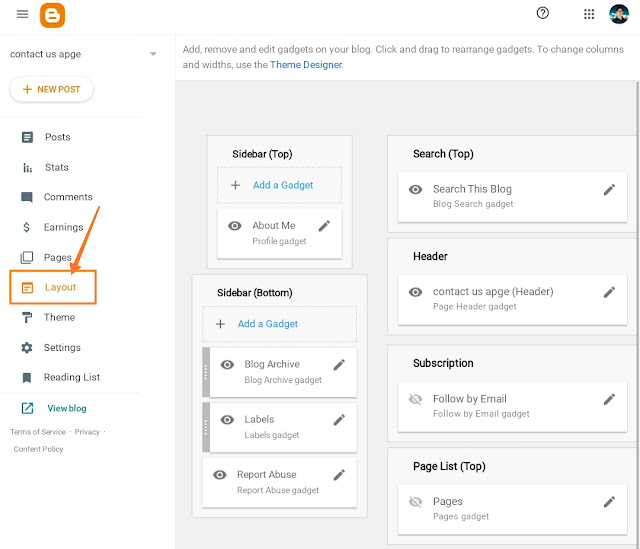
Now Click on layout section from the Blogger dashboard to add the Gadget.
Step 3:
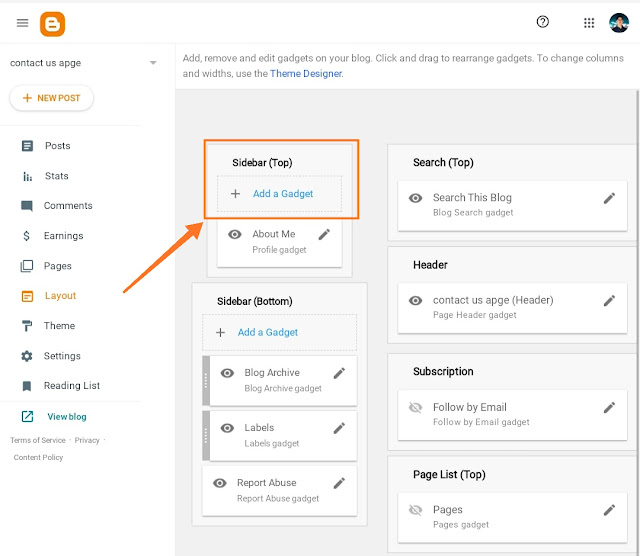
Next thing which you need to do is Click on Add Gadget and it will show you a list of gadget.
Step 4:
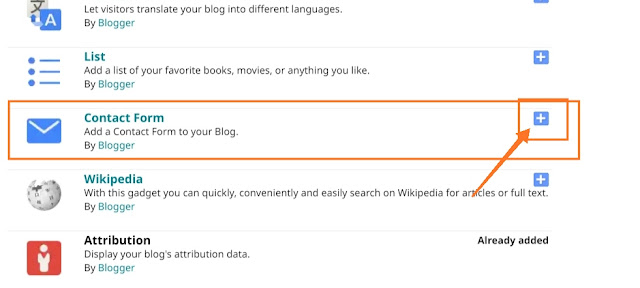
Scroll up and you will find the Contact Form. Just Click on + to add it.
Next is to save this Gadget
Now we have Successfully added the Contact Page but we Have to Hide this and add the Custom Contact Form.
We will use only Some code from the above Contact page.
Before that lets see how to Hide this Gadget.
Part 2: Hiding The Contact Gadget.
Now let's see how to hide the above Contact Gadget.
Step 1:
Now you have to click on Themes section from your Blogger Dashboard.
Step 2:
Next thing is you have to click on three Dots and then click on Edit Html.
Step 3:
Now this part is very important because we are going to add some lines of Css Code.
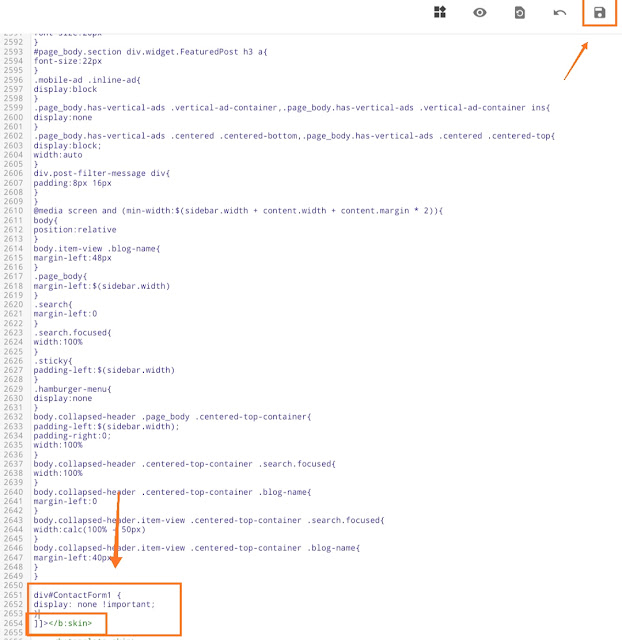
Now search for ]]></b:skin> (You will find it at the end of css ) .
Now copy the below code and paste it before the ]]></b:skin>
HIDING CODE:
div#ContactForm1 {
display: none !important;
}
After pasting it click on save icon.
Next Part is to add the Custom Contact Page.
Part 3: Adding the Custom contact Page in Blogger.
Step 1:
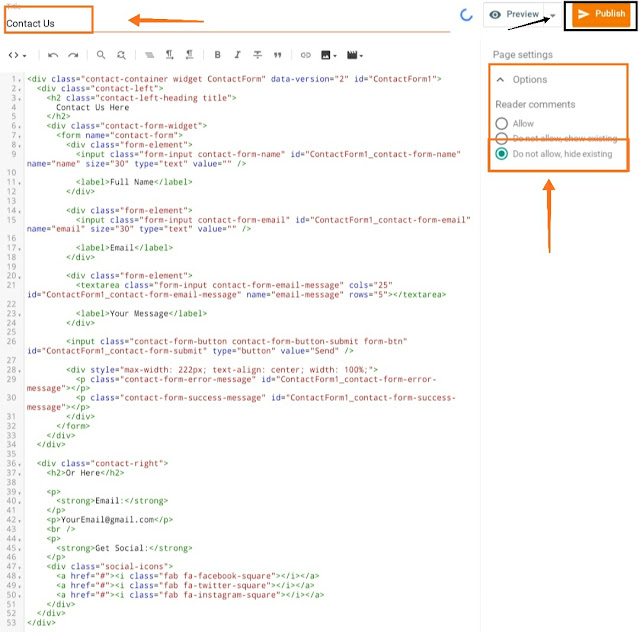
Click on Pages and then click on Add new page.
Step 2:
Here you have to switch to Html view by default it stays in compose view. Make sure to change it to the Html view otherwise nothing is going to work.
Now remove everything and then Copy the Below code and paste it in your contact page.
HTML Code:
<div class="contact-container widget ContactForm" data-version="2" >
  <div class="contact-left">
    <h2 class="contact-left-heading title">
      Contact Us Here
    </h2>
    <div class="contact-form-widget">
      <form name="contact-form">
        <div class="form-element">
          <input class="form-input contact-form-name" id="ContactForm1_contact-form-name" name="name" size="30" type="text" value="" />

          <label>Full Name</label>
        </div>

        <div class="form-element">
          <input class="form-input contact-form-email" id="ContactForm1_contact-form-email" name="email" size="30" type="text" value="" />

          <label>Email</label>
        </div>

        <div class="form-element">
          <textarea class="form-input contact-form-email-message" cols="25" id="ContactForm1_contact-form-email-message" name="email-message" rows="5"></textarea>

          <label>Your Message</label>
        </div>

        <input class="contact-form-button contact-form-button-submit form-btn" id="ContactForm1_contact-form-submit" type="button" value="Send" />

        <div style="max-width: 222px; text-align: center; width: 100%;">
          <p class="contact-form-error-message" id="ContactForm1_contact-form-error-message"></p>
          <p class="contact-form-success-message" id="ContactForm1_contact-form-success-message"></p>
        </div>
      </form>
    </div>
  </div>

  <div class="contact-right">
    <h2>Or Here</h2>

    <p>
      <strong>Email:</strong>
    </p>
    <p>YourEmail@gmail.com</p>
    <br />
    <p>
      <strong>Get Social:</strong>
    </p>
    <div class="social-icons">
      <a href="#"><i class="fab fa-facebook-square"></i></a>
      <a href="#"><i class="fab fa-twitter-square"></i></a>
      <a href="#"><i class="fab fa-instagram-square"></i></a>
    </div>
  </div>
</div>
Step 3:
Make sure to add links to social icons and also replace the email with your email.
Step 4:
Add name to your Contact page and also disable the comment option on your contact form.
Step 5:
Click on Publish button and our Contact Form will be published.
Wait a minute, Dont Leave.
Now when we will visit our Contact Form i know it is not looking good.
To make its design awesome we have to add CSS
Part 4: Adding CSS
Step 1:
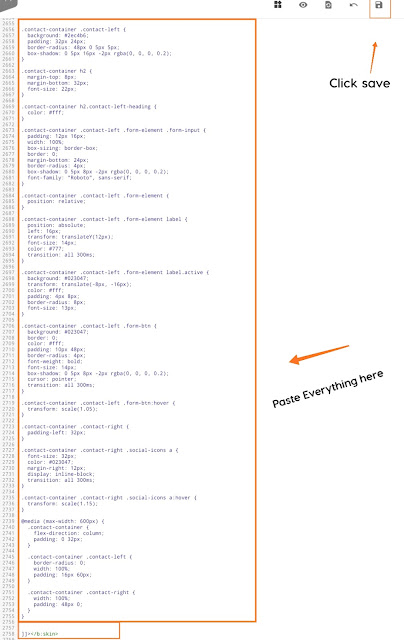
Now again Goto Themes and then click on three dots then again click on edit html.
Step 2:
Again find ]]></b:skin> and paste the below CSS Code above it.
CSS:
/* Custom Contact Page */
.ContactForm {
display: none;
}
body.item-view .ContactForm {
display: flex;
}
.contact-container {
font-family: "Roboto", sans-serif;
display: flex;
align-items: center;
max-width: 800px;
margin: 0 auto;
color: #023047;
padding: 48px 16px;
}
.contact-container .contact-left {
background: #2ec4b6;
padding: 32px 24px;
border-radius: 48px 0 5px 5px;
box-shadow: 0 5px 16px -2px rgba(0, 0, 0, 0.2);
}
.contact-container h2 {
margin-top: 8px;
margin-bottom: 32px;
font-size: 22px;
}
.contact-container h2.contact-left-heading {
color: #fff;
}
.contact-container .contact-left .form-element .form-input {
padding: 12px 16px;
width: 100%;
box-sizing: border-box;
border: 0;
margin-bottom: 24px;
border-radius: 4px;
box-shadow: 0 5px 8px -2px rgba(0, 0, 0, 0.2);
font-family: "Roboto", sans-serif;
}
.contact-container .contact-left .form-element {
position: relative;
}
.contact-container .contact-left .form-element label {
position: absolute;
left: 16px;
transform: translateY(11px);
font-size: 14px;
color: #777;
transition: all 300ms;
}
.contact-container .contact-left .form-element label.active {
background: #023047;
transform: translate(-8px, -16px);
color: #fff;
padding: 0 8px;
border-radius: 8px;
font-size: 13px;
}
.contact-container .contact-left input[type='button'] {
background: #023047;
border: 0;
color: #fff;
padding: 10px 48px;
border-radius: 4px;
font-weight: bold;
font-size: 14px;
box-shadow: 0 5px 8px -2px rgba(0, 0, 0, 0.2);
cursor: pointer;
transition: all 300ms;
}
.contact-container .contact-left input[type='button']:hover {
transform: scale(1.05);
}
.contact-container .contact-right {
padding-left: 32px;
}
.contact-container .contact-right .social-icons a {
font-size: 32px;
color: #023047;
margin-right: 12px;
display: inline-block;
transition: all 300ms;
}
.contact-container .contact-right .social-icons a:hover {
transform: scale(1.15);
}
@media (max-width: 600px) {
.contact-container {
flex-direction: column;
padding: 0 32px;
}
.contact-container .contact-left {
border-radius: 0;
width: 100%;
padding: 16px 60px;
}
.contact-container .contact-right {
width: 100%;
padding: 48px 0;
}
}
Step 3:
Then click on save Button
Now when we look at our Contact Form its design is looking amazing.
Now let's move towards our final Part.
Part 5 : Adding JavaScript
We are adding few lines of JavaScript to animate the placeholders in our Contact Form.
Step 1:
Again click on Themes and then 3 dots then Click on Edit Html.
Step 2:
Scroll down and then goto end of Code and find closing body tag </body>
Step 3:
Now copy the Below JavaScript code and then paste above </body> tag.
JAVASCRIPT:
const formInputs = document.querySelectorAll(".form-input");

formInputs.forEach((formInput) => {
  let thisLabel = formInput.nextElementSibling;

  formInput.addEventListener("focus", () => {
    thisLabel.classList.add("active");
  });

  formInput.addEventListener("blur", () => {
    if (formInput.value === "") {
      thisLabel.classList.remove("active");
    }
  });
});
Step 4:
Click on save button.
Now we have successfully added JavaScript and with this we have successfully completed the Tutorial of How to Add Contact Us Page In Blogger [2025]
If you didn't understand How to Add Contact Us Page then you can watch the video below and it contains all the steps which will make it easier for you to understand all the above steps.
Conclusion:
Now we hope this article How to Add Contact Us Page (Contact Form) In Blogger 2025 was helpful for you.
And also we hope you can now add the Contact Form to your Blog Easily.
If you face any issue while adding Contact Form in your blog then feel free to ask for help in comments below.
If you found this article helpful then don't forget to share this article with your Blogger friends.
You may Like these Posts

