what's going on everybody my name is Rather Aadil founder of TechnoAmpany.
If you are new to Blogging and you want to start a Free Blog just to understand what blogging is then you can read this complete article.
If you are new to Blogging and you want to start a Free Blog just to understand what blogging is then you can read this complete article.
And i am 100% sure that at the end of this article you will definitely create your own Blog/Website without any tension.
so in this blogger tutorial I'm gonna walk you through step One to step Done on How to create a blog with this own custom domain name that's powered by blogger.
Now the reason why you'd want to use blogger over say WordPress is basically two main reasons in my opinion number one would be;
so in this blogger tutorial I'm gonna walk you through step One to step Done on How to create a blog with this own custom domain name that's powered by blogger.
Now the reason why you'd want to use blogger over say WordPress is basically two main reasons in my opinion number one would be;
If you're looking for a solution where you have completely free web hosting which I think is the biggest selling point of blogger.
My website Technoampany is hosted on Blogger and gets over 100 visitors a day makes money and I'm not paying for web hosting and it's just wonderful.
So than you do with say like Google Sites so you can actually build an asset that gets traffic and can make money.
My website Technoampany is hosted on Blogger and gets over 100 visitors a day makes money and I'm not paying for web hosting and it's just wonderful.
It's just as an asset that just generates a little bit of money on the side for me and I think that's really cool about blogger that you can do that because with blogger you have control over the on-page SEO more.
So than you do with say like Google Sites so you can actually build an asset that gets traffic and can make money.
Now blogger is ideal if you're creating a more of a personalised blog maybe you're Youtuber and you want to create blog to go along with your videos or maybe you just want to create like a travel guide on the city you're living in.
Blogger is ideal for that like if you're someone who wants to build like a big massive website that's going to be like a sellable asset then you probably should go with WordPress.
But if you're ok with building like a nice blogger blog maybe it makes a few hundred dollars on the side it's like a passive income thing it's just a little side project you do for fun that's when you should use blogger.
SO if you're ready to get started with the step by step on How to Create a Free Blog on Blogger in 2025 then just keep reading the step by step Guide.
Before we start lets discuss briefly about;
What is blogger ?
Blogger.com is a free blogging platform owned by google itself.
Blogger is a free platform where you can host a blog for free with a free subdomain like technoampany.blogspot.com/
But we recommend you to buy a custom domain and connect that with blogger to make your blog look like professional.
Now lets see what are the advantages of starting a blog on Blogger.
Advantages of Blogger:
- Starting a blog on blogger is easy and Free.
- Blogger.com is owned by Google that means you can trust it.
- If you want to get Google adsense Approval on a free blog then you can start a blog on Blogger and Get Google Adsense Approval easily.
- Blogger provides you complete freedom.
Now without wasting any more time lets get directly into our main Topic
How To Start a Free Blog on Blogspot in 2025
Now you know all about blogger including its Advantages , So lets start making our blog step by step.
To get started first of all you need to have a Gmail account. If you don't have you can create one in Gmail.com
You may Like this post
STEP 1:
Creating A Blogger Account.
First of all goto Blogger.com where we will start making our Blog.
After visiting Blogger you will be Greeted with landing page Asking you to create a blog.
As we know Blogger is owned by Google, So you can easily create a blogger Account using Your Google account.
Now click on 'Create a Blog' And Your Blog making process starts.
STEP 2
Name Your Blog and Choose A Theme.
In the Next step, You will be asked to choose Name and Domain name for Your Blog.
If you don't know what domain is then let me tell you that.
Domain name is the address for your blog where people can find your blog around the world.
Now moving ahead;
First set Name for your Blog which will be Shown in Google later.
Next choose Domain Name for your Blog Make sure to keep it short and simple so that your Readers can easily remember it.
When you complete the above two things now scroll up and Choose a theme for your blog .These themes are provided by google.
You can easily use these themes later in your Blogger dashboard.
Now click on "Create Blog " button and now you have sucessfully created your Blog for Free but stay On there is a lot more things to do.
STEP 3
Set-Up Your Blog
Now after Creating a Free blog its time to Set Up it For Search Engines like Google and Bing.
You need to do these things for Once.
To optimize your Blog you need to Click on Setting inside Your Blogger Dashboard .
In 2020 Blogger Dashboard was updated by Google and now everything is in Setting.
Before update there was a seperate section for everything.
Blogger Setting
1.Adding Description to your Blog
Adding Description helps Search engines and Your readers to know what Your Blog is about.
Just Click on Edit next to Description and add Desciption.
Make sure to add Description related to your Topic.
2.Adding Favicon
Now scroll Down and you will see Add Favicon.If you don't know what Favicon is then let me tell you;
Favicon is a small image (16×16) that is used for Branding of you website.Basically it helps your readers to remember your website.
Now to add Favicon to your Blog just click on Add and upload a image (square).
3.Enable HTTPS
HTTPS stands for Hypertext Transfer Protocol secure. Basically it helps to make your website more secure.
In Blogger.com you will get this HTTPS redirect for free.
But if you are on Wordpress you need to Buy SSL in order to enable the HTTPS.
To enable the HTTPS just click on Toggle button and enable it.
4.Add Comment Filters
Adding Filters for comments is very important because it will help you to avoid spam comments on your Blog.
First change the setting for "Who can comment" and change it to User with Google Account.
It means only those readers can comment which will be logged in to Their Google Account (Gmail Account).
Next change the "Comment Moderation" to Always.
This is the main part to avoid spam comments on your Blog because when any User will comment on your Blog it will not be Published untill you will approve His/Her comment.
Now lets Move To Another point which is;
5.Optimize Your Blog for SEO
In this part you will set up Your Blog For SEO (Search Engine Optimization).
Here you have to enable Meta Tags for your Blog.
To Enable Meta Description click on Toggle Button and a new section will appear named as 'Search Description'.
In this search Description you have to add a Brief summary about your blog.
This Summary will appear below the Title of Your Blog in Search Engines like Google and Bing.
So make sure to add a Quality summery that attracts user from search Engines.
6.Enable Crawling and Indexing For your Blog.
This is very important step .
Enabling Crawling and Indexing for your Blog will help search Engine bots to crawl your website and make it visible for users in search Engines.
First Click on Enable 'custom robots.txt'
toggle button then a new option will appear named as 'Add Custom Robots.txt'.
Add the below code in this Section but make sure to replace the highlighted text with your website URL.
User-agent: *
Disallow: /search
Allow: /
Sitemap: https://YourUrl.blogspot.com/atom.xml?redirect=false&start-index=1&max-results=500By Enabling the 'Custom robots header tags'
the Sarch Engine bots will understand which pages we have to index and which not.
So this is very important because we dont want Google should Index our Categories and Many other things.
So,Here click on Enable Custom robots header tags toggle button and here three more options will appear.
- First 'Home page tags' click on it and enable 'ALL' and 'Noodp'.
- Second 'Archive and search page tags' click on it and enable 'noindex' and 'noodp'.
- Third 'Posts and page tags' click on it and enable 'All' and 'Noodp'.
Now we have completed the Setting Section of our Blog.
Now lets move to another step which is;
STEP 4:
Editing Theme and Layout.
Now in this step we will Change the Theme of our Blog and setup the front side of our Blog.
As i told you earlier Blogger has a wide range of free Themes. These themes are simple as well as easy to setup but these In-Built provided themes are not good at all.
So we will use Custom Blogger Template.
We have already a complete Article on Best Blogger Themes in 2025 . Make sure to check it out and download any theme from the article.
Now when you Download the Theme it's time to upload it on Your Blogger Blog.
First, you have to extract the theme in your File Manager. So that we get a .XML file from it.
Because Blogger only accepts XHTML.
Now to upload the Theme Goto 'Theme' from Your Blogger Dashboard and click on the 'Arrow' icon then click on 'Restore' and upload the XML file from the Theme which you Downloaded.
Now when the uploading process completes again click on the 'Arrow' then click on Mobile setting and here check that desktop view is enabled or not.
If it is not enabled just click on the desktop and it will enable it easily.
STEP 5:
How To Add Important Pages in Blogger
After completing all the above steps we can move to another step which is adding some Important Pages.
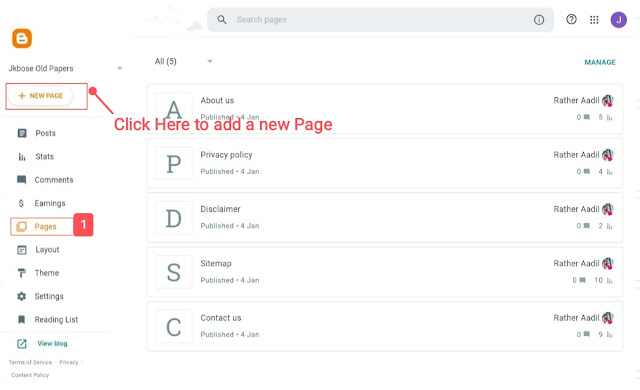
To add pages to Your website Just go to Your Blogger Dashboard and on the left side, menu click on Pages.
Then at the top left click on 'Add page' to add new pages.
Now let's add our First page which is the About us page.
1. About Us
About Us, page is very important for every website/Blog because on this page you can write about yourself and your website/Blog.
I will recommend you to write in detail about your website like what you do, what type of content your viewers can expect, and a lot more.
Also, Make sure to write about yourself like whose behind this Blog. Write about your education, experience, and much more.
There are some website on Google that provides you readymade 'About Us' page. If you can't write about yourself in detail then you can use these tools.
But I don't recommend you these readymade tools.
2. Contact Us
Contact Us page is also important because it helps your viewers to get connected with you in just some clicks.
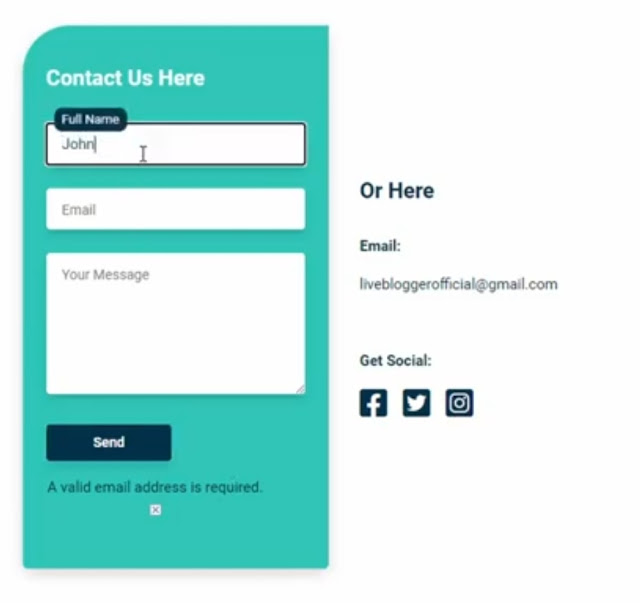
They just need to enter their Email I'd , Name, and Message so that they can contact you.
Now coming to the point of How to Add contact Us page in Blogger.
Well if you'll search on google regarding it then you can face a lot of problems but to make it easy for you we have already written an article about How to Add contact Us page in Blogger.
There are some steps you need to follow and you are done.
If you'll follow all the steps and at the end, your Contact Us page will look like the image below.
Now let's create other important pages as well.
3. Privacy and Policy
The Privacy and Policy page is much more important. There is a couple of reason for adding this page.
On this page, you have to write about what type of information you took from your viewers, what type of links you promote on your website, and a lot more things.
Don't worry you have not to write this by yourself like the about us page.
To create Privacy and Policy you can use online tools like privacypolicygenerator . This tool provides you with everything readymade.
Just visit this tool enter all information about your website and this tool will provide you your Privacy Policy.
Another reason for adding this page is if you want to earn from your website using Google AdSense then you have to add this page.
Because Google will not approve your website without these pages. So make sure to add these pages.
Now let's move to our last important page.
4. Disclaimer
Adding a Disclaimer page is also very important because on this page you've to write For what things your website is responsible for and what not and much more.
To create this page you can take the help of Online Tools like FreeDisclaimerGenerator .
Just visit this website and select all those steps that your website is responsible for and within a minute your Disclaimer Will be ready.
Boom! you have created all Important pages Successfully.
Now let's go to other steps of Blog/Website setup.
STEP 6:
How To Submit Your website in Google Search Console
Well let me tell you that we could have done this thing in STEP 3 (Setup Your Blog) but in my opinion at that time without Adding a new theme/Creating Pages and other things Submitting a website in Google Search Console doesn't add any value.
So, Let's complete this step now.
To get started First go to setting in your Blogger Dashboard and in the Privacy section "Enable Visible To Search Engines" Option.
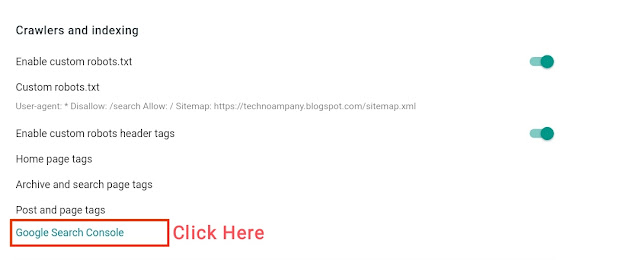
Then scroll up and in the section of "Crawling and Indexing" Click on the Google search console or just search in Google for the same.
Now, a new page will be shown on your screen, just copy the URL of your website (https://www.example.com) and paste it in the second option named URL PREFIX and click on Continue.
Inside the setting option click on "Ownership Verification" And then click on HTML TAG and copy the code.
Now go to your Blogger website Dashboard and click on Themes »Edit Html » and now paste the code just below the <head> tag.
Now click on the save button and again go to Google search console and click on Verify.
Now You have successfully set up a Google search console for your website.
Now moving forward let's submit the " XML Sitemap" of your website in the Google search console.
Before that let's understand,
What is Sitemap?
A sitemap is a list of pages of your website inside a domain, or in other words, we can say it is the structure of your website.
What are the benefits of submitting XML Sitemap?
The Benefits of submitting XML Sitemap are that it helps in getting the articles/pages indexed in search engines faster. And indirectly that will help you in Ranking.
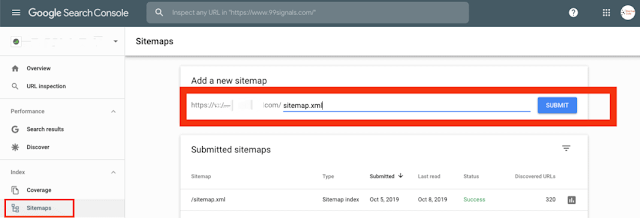
Now let's know how to submit XML Sitemap in the Google search console
- First, go to Google search console
- Now inside the Google search console click on Sitemap from the left side menu.
- Now type sitemap.xml in the text menu.
- Click submit
Now Google will take some time to verify this sitemap or in some cases, it verifies sitemaps instantly.
Ok, with this we have completed the 6th Step successfully.
Now let's move to our Next as well as the Last Step.
Step 7:
How to Add Google Analytics to Blogger
Google Analytics is a tool provided by Google itself. This Tool helps you in various aspects.
Like it helps in tracking the Real-time viewers (how many viewers are currently on your website). It also helps in tracking the country, state, of your viewers. It will also tell you How your viewers are finding your blog and much more.
Basically, Google Analytics will help you in analyzing your website in every aspect.
Now let's know How to Add Google Analytics to Blogger.
First of all Visit Google Analytics Main page. And a new page will appear on your screen.
Next, Click on the start measuring button.
Here our Main process of adding Google Analytics to your website starts.
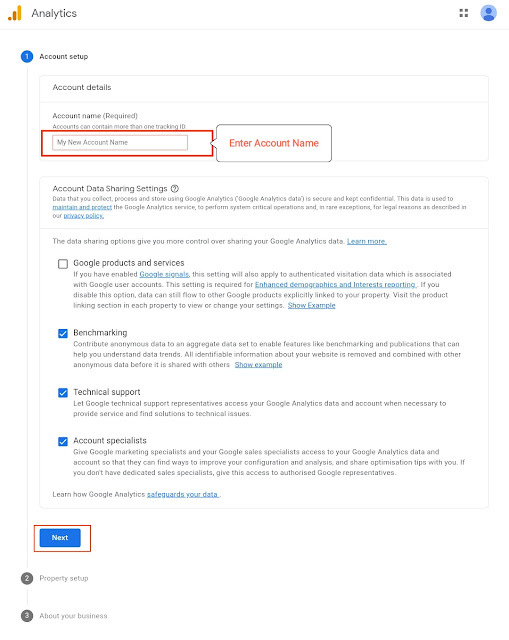
Account Setup:
In the First step just Type the Name of your Account and just click on the Next button for further process.
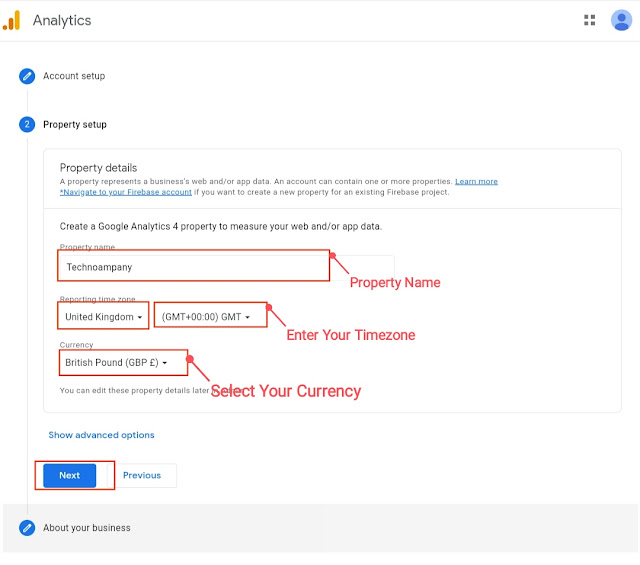
Property setup:
In this step Just Type Name for your property, it could be anything like your website name or something else but I recommend you to type your website name.
Next, select the Timezone and currency according to your country.
Then click on Next.
About Your Business:
In this step select the category of your website.
Then the size of your Business like how many persons are you working this website.
Then moving below click on all the related steps and click on Create.
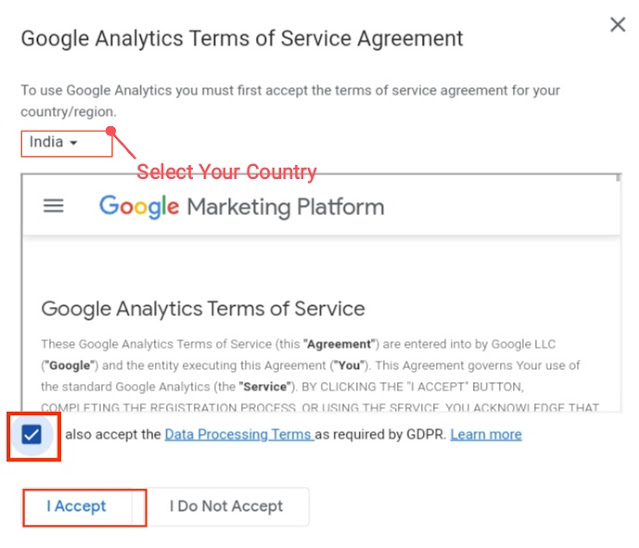
Now a new pop-up window will appear just select your country and below tick the button and then click on I accept.
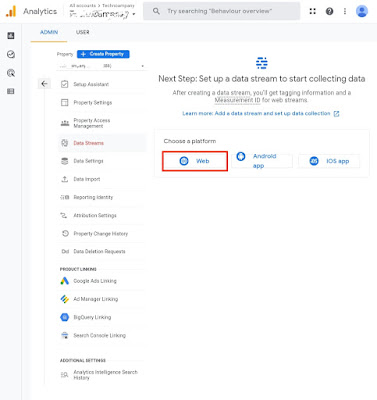
Now let's move to another step, which is setting up your stream.
Click on the web then a new window will open.
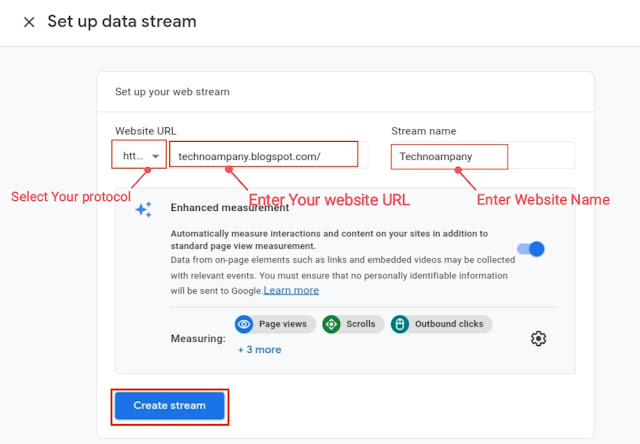
Then enter your website URL without HTTPS and next to it enter your website name, and click on create Stream.
Now in the next step click on Google site tag then copy all the code,
Now go to Blogger Dashboard of your website then go to Themes» Edit Html» and paste all the code below <head> tag.
Click on Save and you are done.
Now-Again go to Google Analytics and close the previous window then click on this Real-time icon and you can start watching the data of your website.
Conclusion:
So Now we know How To Start a Free Blog on Blogspot in 2025 and as I mentioned earlier in this Step by step guide at the end of this article you can create your website easily. And here again, I recommend you not to use the subdomain provided by the blogger.
You can simply use a custom domain and there are a lot of domain name providers in this market. In my opinion, GoDaddy will be best as I have bought domains from them in past and my experience was great.
Now if you still have any doubt about How To Start a Free Blog on Blogspot in 2025 then don't worry about it just comment down below and we'll be here for your help.
Also, make sure to tell us how was this article helpful for you.
Bonus Tip:
Also Check:

